Roof Tarping in Miami: Emergency Tarping Services, Costs, and What to Expect
How to Get a Miami Roof Tarp That Actually Holds Up
Roof tarping is the most important temporary protection measure after storm damage in Miami. Between the Gulf Stream humidity, daily afternoon thunderstorms, and mold that starts growing within 48 hours of water intrusion, every hour your damaged roof sits uncovered is compounding the damage inside your home.
But here's the thing most Miami homeowners don't realize: not all tarps are equal, and a bad tarp installation can actually make things worse. I've seen flapping tarps tear roofing underneath them during wind events. I've seen tarps held down with duct tape blow off in the first thunderstorm. I've seen storm chasers charge $3,000 for "emergency tarping" that amounted to a $30 Home Depot tarp thrown across the roof with no attachment.
This post covers how to get a real emergency roof tarp in Miami, what the proper installation looks like, how much to pay for legitimate tarping work, and how to avoid the scams that proliferate after every major storm.
When You Need Emergency Roof Tarping
Emergency roof tarping is necessary whenever your roof has a breach that allows or threatens to allow water intrusion:
- Missing shingles or tiles exposing underlayment or decking
- Storm damage that has created holes or lifted sections of roofing
- Tree impact that has penetrated the roof surface
- Wind damage that has peeled back flashing, ridge caps, or edge materials
- Failed repairs from previous patching that has deteriorated
- Structural damage where sections of decking are missing or compromised
The Urgency Factor in Miami
Miami's climate makes roof tarping more urgent than in other parts of the country:
- Daily rain: From May through October, afternoon thunderstorms are nearly guaranteed
- Tropical humidity: 70% to 90% humidity means mold can establish colonies within 24 to 48 hours of water intrusion
- Hurricane season: June through November brings the risk of additional storms compounding existing damage
- UV intensity: Extreme UV exposure degrades exposed underlayment and decking rapidly
- Wind-driven rain: Even moderate storms drive rain sideways through small openings
Professional Roof Tarping vs. DIY
Professional Tarping
Professional roof tarping is the recommended approach for most situations. Licensed roofers have the equipment, training, and safety protocols to install tarps that will withstand weather until permanent storm damage repairs can be completed.
Professional tarping process:
- Safety assessment: Structural evaluation to ensure the roof can support workers
- Damage measurement: Determining the area to be covered (minimum 4 feet beyond damage on all sides)
- Debris removal: Clearing broken tiles, branches, and loose materials from the tarp area
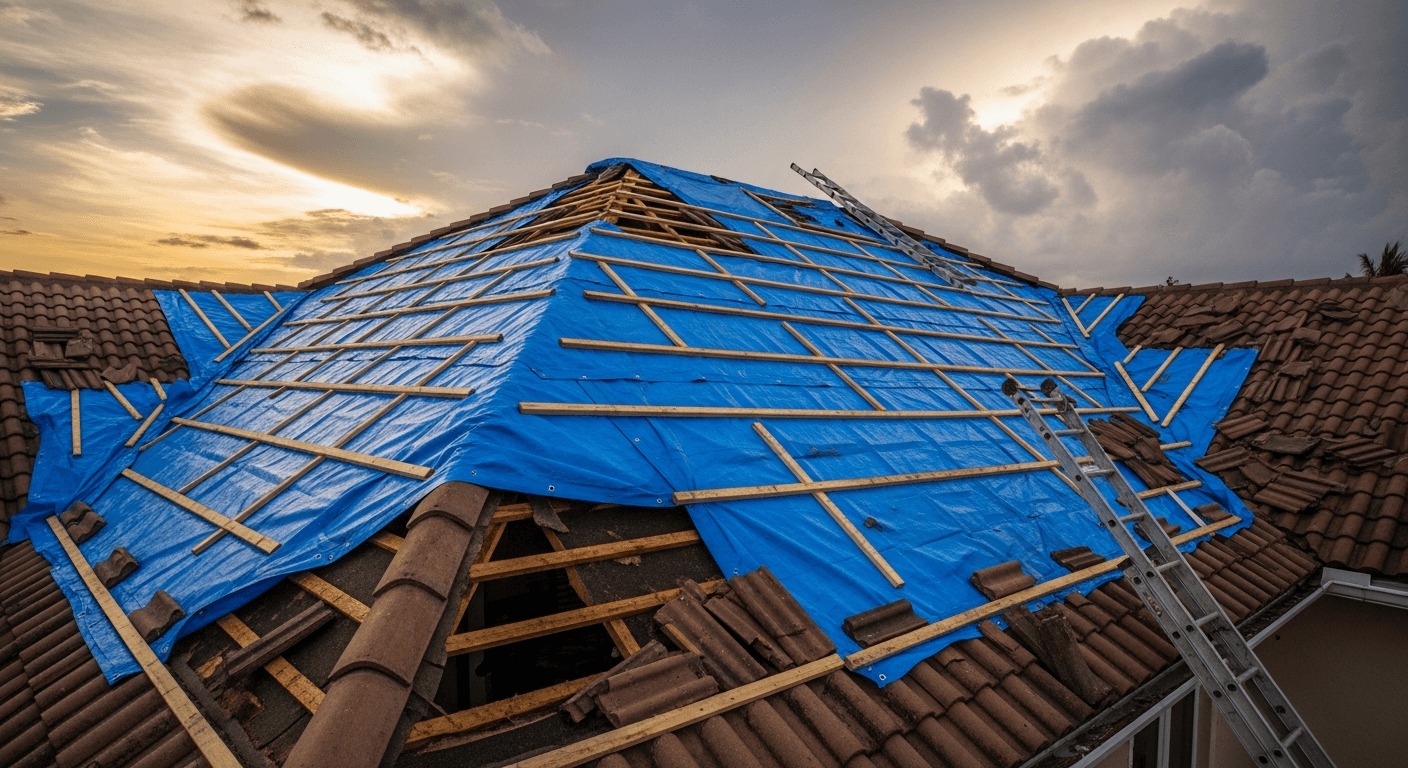
- Tarp deployment: Heavy-duty commercial-grade tarp positioned over the damage and extending past the ridge when possible
- Mechanical securing: 2x4 lumber strips screwed through the tarp into solid roof decking at 2-foot intervals
- Edge sealing: Tarp edges secured and sealed to prevent wind from catching underneath
- Drainage verification: Ensuring the tarp sheds water properly and does not create ponding
Professional tarping costs in Miami:
| Coverage Area | Cost Range | Includes |
|---|---|---|
| Small (up to 100 sq ft) | $500 - $1,000 | One tarp, lumber, screws, labor |
| Medium (100-500 sq ft) | $1,000 - $2,000 | Multiple tarps, full securing |
| Large (500-1,000 sq ft) | $2,000 - $3,500 | Commercial-grade tarps, extensive securing |
| Extra large (1,000+ sq ft) | $3,500 - $5,000+ | Multiple large tarps, heavy reinforcement |
After major hurricanes, expect prices to increase 20% to 50% due to demand.
DIY Tarping (When Professional Help Is Not Available)
After a major hurricane, professional tarping crews may be unavailable for days or weeks. If you must tarp your roof yourself, follow these safety-critical guidelines:
Safety requirements:
- Never go on a wet roof, wait until the surface is dry
- Never work alone, have a helper on the ground at minimum
- Use a sturdy extension ladder placed on firm, level ground
- Wear rubber-soled shoes, work gloves, and safety glasses
- Check structural integrity before stepping on any surface, if decking feels spongy, do not proceed
- Be aware of power lines, check clearance from all sides before raising a ladder
DIY tarping step-by-step:
- Select your tarp: Heavy-duty polyethylene, minimum 6 mil thickness (10 mil preferred), UV-treated
- Size it correctly: The tarp must extend at least 4 feet beyond the damaged area on all sides
- Position the tarp: Ideally drape it over the ridge so water sheds on both sides; if not possible, extend the top edge at least 4 feet above the damage
- Secure with lumber and screws: Place 2x4 or 1x3 lumber strips along the edges of the tarp and screw through both tarp and lumber into the roof decking using 3-inch deck screws at 12-inch intervals
- Wrap and secure bottom edge: Fold the bottom edge of the tarp around a length of lumber and screw it into the decking to prevent wind from lifting the tarp edge
- Seal the top edge: The top edge is the most critical, if water gets under the top, it defeats the purpose. Extend past the ridge or use roofing cement to seal the top edge to the roof surface
- Check tension: The tarp should be taut with no flapping sections that wind can catch
Common DIY mistakes to avoid:
- Insufficient coverage: Covering only the damaged area without extending past it
- Weight-only securing: Using sandbags, rocks, or bricks instead of mechanical fasteners, these blow off in 30+ mph winds
- Nail-only securing: Nails tear through tarp material; use screws with lumber strips
- Loose tarp: A flapping tarp creates wind resistance that will tear it off and can cause additional roof damage
- Blocking drainage: Tarp creates ponding that adds weight and causes leaks at the edges
FEMA Operation Blue Roof Program
After a federally declared disaster, FEMA may activate Operation Blue Roof, which provides free temporary roof covering to affected homeowners.
How Blue Roof Works
- Disaster declaration: The President declares a major disaster in your area
- Program activation: FEMA activates Blue Roof for the affected counties
- Registration: Homeowners register online (blueroof.us) or at a local Disaster Recovery Center
- Assessment: USACE (U.S. Army Corps of Engineers) contractors inspect your roof
- Installation: If eligible, contractors install a fiber-reinforced plastic sheeting system
- Duration: Blue Roof coverings are designed to last 30 days but often remain effective for 60 to 90 days
Eligibility Requirements
- Your home must be in a federally declared disaster area
- The damage must be to the primary residence (not rental or vacation properties in most activations)
- The roof must be structurally sound enough to support the covering system
- You must sign a Right of Entry form allowing USACE contractors access to your property
- The program is free to homeowners
Blue Roof Limitations
- Not available for every storm: Only activated for major federally declared disasters
- Timeline: It can take 1 to 4 weeks after activation for installation, during which you need interim protection
- Temporary only: Designed to last 30 days; permanent repairs are still your responsibility
- Structural requirement: Homes with severe structural damage may not qualify
- Coverage: Only covers the damaged area plus appropriate overlap; not the entire roof
Tarp Duration and Maintenance
How Long a Tarp Lasts
| Tarp Type | Expected Duration | Best For |
|---|---|---|
| Standard poly tarp (6 mil) | 2-4 weeks | Short-term emergency |
| Heavy-duty poly tarp (10 mil) | 4-8 weeks | Medium-term protection |
| UV-treated commercial tarp | 3-6 months | Extended wait for repairs |
| FEMA Blue Roof sheeting | 1-3 months | Post-disaster coverage |
Miami's UV intensity degrades tarp material faster than in northern climates. Budget for tarp replacement every 4 to 8 weeks if permanent repairs are delayed.
Tarp Maintenance Checklist
Inspect your tarp regularly, especially after rain and wind events:
- Check for tears or holes: Patch immediately with tarp tape or replace the section
- Verify all fasteners are secure: Re-screw any loose lumber strips
- Confirm drainage is working: No ponding water on the tarp surface
- Look for wind damage: Lifted edges, loosened corners, or flapping sections
- Check interior for new leaks: A tarp failure may not be obvious from outside
- Replace degraded tarps: If the tarp is brittle, cracking, or has significant UV damage, replace it
Re-Tarping Costs
If your tarp fails before permanent repairs, re-tarping costs are typically:
- Same contractor re-tarp: $200 to $500 (if using existing attachment points)
- New tarp installation: Full cost if the original tarp is completely failed
- After-hours re-tarp: 25% to 50% surcharge for emergency re-tarping during a storm
Insurance Coverage for Roof Tarping
What Is Covered
Most Florida homeowners insurance policies cover roof tarping as an emergency temporary repair under your duty to mitigate further damage. Key points:
- Tarping costs are typically separate from your permanent repair claim and hurricane deductible
- Reasonable costs are covered, "reasonable" means what a typical contractor would charge in your area under similar circumstances
- Multiple tarpings may be covered if the first tarp fails before permanent repairs are completed
- DIY materials are covered too, keep all receipts for tarps, lumber, screws, and hardware
Documentation for Insurance
To ensure your tarping costs are covered:
- Photograph the damage before tarping
- Photograph the tarp installation showing coverage and securing method
- Keep all receipts (materials, labor, contractor invoices)
- Get a written invoice from professional tarping services with itemized costs
- Report tarping costs to your insurance company as part of your emergency repair documentation
- File separately from your permanent repair claim if your insurer requires it
What Is Not Covered
- Tarping for maintenance issues (pre-existing leaks, worn materials)
- Tarping for damage excluded by your policy (flood, neglect)
- Excessive costs that exceed reasonable market rates
- Tarping of non-primary structures unless specifically covered by your policy
Transitioning From Tarp to Permanent Repair
A tarp is temporary protection, not a solution. Plan your transition to permanent repair:
While Under Tarp
- File your insurance claim if not already done
- Get contractor estimates for permanent re-roofing or repair
- Coordinate with your adjuster to approve repair scope and cost
- Order materials early, after major storms, lead times for roofing materials increase significantly
- Schedule your contractor as early as possible in their queue
Timeline Management
| Action | Target Timeline |
|---|---|
| File insurance claim | Within 48 hours of damage |
| Get contractor estimates | Within 1-2 weeks |
| Adjuster inspection | 1-4 weeks (varies post-storm) |
| Claim approval | 2-8 weeks |
| Material ordering | Immediately upon approval |
| Permanent repair | 1-4 weeks after materials arrive |
The total time under tarp typically ranges from 4 to 16 weeks under normal conditions and can extend to 6 months or more after a major hurricane.
Preventing Additional Damage While Under Tarp
- Inspect the tarp weekly and after every storm
- Maintain interior dehumidification to prevent mold
- Monitor attic conditions for new water intrusion
- Address any interior damage promptly, waiting compounds repair costs
- Keep communication open with your contractor and adjuster
Emergency Tarping Supply List
Every South Florida homeowner should stock these supplies before hurricane season:
| Item | Quantity | Specifications |
|---|---|---|
| Heavy-duty tarps | 2 minimum | 20x25 ft, 10 mil, UV-treated |
| Furring strips | 8 pieces | 1x3 or 2x4, 8-foot lengths |
| Deck screws | 2 boxes | 3-inch coarse thread |
| Cordless drill | 1 | With charged battery and spare |
| Tarp tape | 2 rolls | For patching tears |
| Roofing cement | 1 gallon | For sealing edges |
| Work gloves | 2 pairs | Leather or heavy-duty |
| Safety glasses | 1 pair | Impact-rated |
| Extension ladder | 1 | Rated for your roof height |
Store these materials in your garage in a waterproof container. When storm watches are issued, tarps and plywood sell out within hours.
Extreme Roofing Inc. provides professional emergency tarping services across Miami-Dade, Broward, and Palm Beach counties. We carry commercial-grade materials and install tarps designed to withstand South Florida weather conditions until your permanent repair is completed.
Call 305-225-1535 or request a free estimate for emergency roof tarping or permanent storm damage repair.
Frequently Asked Questions
How much does roof tarping cost in Miami?
Professional roof tarping in Miami costs $500 to $1,000 for small areas up to 100 sq ft, $1,000 to $2,000 for medium coverage, $2,000 to $3,500 for large areas, and $3,500 to $5,000 or more for extensive coverage. After major hurricanes, prices increase 20% to 50%. FEMA's Operation Blue Roof program provides free tarping after federally declared disasters. Most insurance policies cover tarping as a separate emergency expense.
How long does a roof tarp last in Miami?
A standard 6-mil poly tarp lasts 2 to 4 weeks in Miami's intense UV and weather conditions. Heavy-duty 10-mil tarps last 4 to 8 weeks, and UV-treated commercial tarps can last 3 to 6 months. FEMA Blue Roof sheeting is designed for 30 days but often lasts 60 to 90 days. Miami's UV intensity degrades tarps faster than northern climates. Plan for replacement every 4 to 8 weeks if permanent repairs are delayed.
Does insurance cover roof tarping in Florida?
Yes, most Florida homeowners insurance policies cover emergency roof tarping as a temporary repair expense, typically separate from your permanent repair claim and hurricane deductible. Your policy requires you to take reasonable steps to prevent further damage. Keep all receipts and photographs for documentation. DIY tarping material costs are also covered with proper documentation.
Can I tarp my roof myself after a hurricane?
DIY tarping is possible for small, accessible areas if you follow safety protocols. Never work on a wet roof or alone, use rubber-soled shoes, and check structural integrity before stepping on any surface. Secure tarps with 2x4 lumber strips screwed into the decking, not with sandbags or nails alone. For large areas, structural damage, or steep roofs, call a professional. Safety is more important than speed.
What is the FEMA Blue Roof program?
FEMA's Operation Blue Roof provides free temporary roof covering to homeowners after a federally declared major disaster. The U.S. Army Corps of Engineers installs fiber-reinforced plastic sheeting designed to last 30 to 90 days. You must register at blueroof.us or a local Disaster Recovery Center and sign a Right of Entry form. The program covers primary residences with structurally sound roofs. Installation can take 1 to 4 weeks after activation.
Need Roofing Help?
Whether you need an inspection, repair, or full replacement, our team of licensed roofing professionals is ready to help. Serving South Florida since 2004.
Related Articles
Your Miami roof is leaking or damaged, here is exactly what to do. Step-by-step emergency roof repair guide covering safety, temporary fixes, insurance, and finding a licensed contractor fast.
Read MoreLearn how to identify hurricane roof damage in Miami, document it properly for insurance claims, and choose the right repair strategy for your South Florida home.
Read MoreEverything Miami homeowners need to know about storm damage roof repair, from emergency response and insurance claims to choosing a licensed contractor and understanding repair timelines.
Read More